Using Attendee Self-Registration with Events
- Browser
- iPad
Event organizers can send a unique event registration link to potential attendees to better prepare for an event and capture attendee interest. Attendees can select this link to view important event details and self-register to the event by filling out required information.
Each event is automatically assigned a unique registration link that can be distributed through any invitation channel, for example, Approved Email and Print Invitation materials.
Business admin users can create registration form templates corresponding to products, event formats, location types, and event types in their organization. These templates can be manually assigned to an event, or automatically assigned based on event attributes and Event Rules.
Two types of registration forms are available:
- Open registration – Anyone can access the event registration link and register. This is useful when sending the link to offices and hospitals, where link recipients can register and forward the link to other potential attendees.
- Closed registration – Only targeted recipients who receive the link through Approved Email can register
Once recipients register for an event, event organizers can view and approve or reject the registrant. Event organizers approve registrants by reconciling the registrant, just as they would reconcile a walk-in attendee.
Who Can Use this Feature?
- Platforms – Browser, iPad
- Licensing – Available to users with Events Management
- Users – Business Admin Users, Integration Users, Content Creators, End Users
Configuring the Event Registration Form
Business Admin Users and Integration Users
To configure this feature for business admin users and integration users:
-
Ensure the appropriate optional features are configured:
- Using Approved Email for Events Management – Enables syncing Confirmation and Rejection email templates from Vault
- Event Attendance Rules – Enables running business rules when reconciling registrants, ensuring greater compliance
- Managing Event Materials – Enables adding a QR Code® to the registration form to Print Templates
-
Grant the following permissions:
Object OLS Record Types Fields FLS EM_Attendee_vod CRU n/a - First_Name_vod
- Last_Name_vod
- Email_vod
- Registration_Status_vod
- Registration_Timestamp_vod
- Registration_Method_vod
- Status_vod
- Walk_In_Status_vod
- Fields configured in Registration_Field_vod on registration forms
Edit EM_Catalog_vod CRUD Registration_Form_vod - Event_Fields_vod
- Registration_Fields_vod
- Disclaimer_Text_vod
- Registration_Type_vod
- Approval_Required_vod
- Confirmation_Email_Template_vod
- Rejection_Email_Template_vod
- Product_vod*
- Location_Type_vod*
- Event_Format_vod*
Edit EM_Event_Rule_vod CRUD Registration_vod - Registration_Form_vod
- Event_Configuration_vod
Edit EM_Event_Speaker_vod
This object is only required when using the {{EventSpeaker}} token or when capturing registration for speakers.
CRU - First_Name_vod
- Last_Name_vod
- Email_vod
- Registration_Timestamp_vod
- Status_vod
- Speaker_Formatted_Name_vod
- Fields configured in Registration_Field_vod on registration forms
Edit EM_Event_vod CRU - Publish_Event_vod
- Registration_Form_vod
- Registration_URL_vod
- Registration_URL_Long_vod
- Fields configured in Event_Fields_vod on registration forms
- Product_vod*
- Location_Type_vod*
- Event_Format_vod*
Edit *These fields are optional and enable assigning forms based on event attributes.
- Grant business admin users and integration users access to the Registration & QR Sign In Administration tab.
-
Add the following picklist values to the crm_template_subtype__v field in the MedComms or PromoMats Vault integrated with Approved Email. This step is only required when using this feature with Approved Email for Events Management:
- registration_confirmation_vod
- registration_rejection_vod
End Users
To configure this feature for end users:
- Ensure Reconciling Walk-in Attendees is enabled for event organizers to review and approve or reject open registrants.
-
Grant the following permissions:
Object OLS Record Type Fields FLS EM_Catalog_vod R n/a - Event_Fields_vod
- Registration_Fields_vod
- Disclaimer_Text_vod
- Registration_Type_vod
- Approval_Required_vod
- Confirmation_Email_Template_vod
- Rejection_Email_Template_vod
- Product_vod*
- Location_Type_vod*
- Event_Format_vod*
Read EM_Event_vod CRU n/a - Registration_Form_vod
- Registration_URL_vod
- Registration_URL_Long_vod
Edit - Publish_Event_vod
- Fields configured in Event_Fields_vod on registration forms
- Product_vod*
- Location_Type_vod*
- Event_Format_vod*
Read EM_Event_Rule_vod R n/a - Registration_Form_vod
- Event_Configuration_vod
Read EM_Attendee_vod CRU n/a - First_Name_vod
- Last_Name_vod
- Email_vod
- Registration_Timestamp_vod
- Registration_Method_vod
- Fields configured in Registration_Field_vod on registration forms
Read - Registration_Status_vod
- Status_vod
- Walk_In_Status_vod
Edit EM_Event_Speaker_vod
This object is only required when using the {{EventSpeaker}} token or when capturing registration for speakers.
CRU n/a - First_Name_vod
- Last_Name_vod
- Email_vod
- Registration_Timestamp_vod
- Speaker_Formatted_Name_vod
- Fields configured in Registration_Field_vod on registration forms
Read Status_vod
Edit
*These fields are optional and enable assigning forms based on event attributes.
Defining the Registration Integration User
Events created with a populated Registration_Form_vod field, as well as the registration form templates themselves, must be synced to the server via an integration user before registration links can be used by recipients:
- Navigate to the Registration & QR Sign In Administration tab.
- Select Edit in the Veeva CRM Connection Management section.
- Enter the appropriate administrator credentials.
- Select Is This a Sandbox? If the org is a sandbox.
- Select Save.
If Signing into an Event using a QR Code® is enabled, the same integration user credentials can be used.
Scheduling the Event Registration & Sign In Process
The Event Registration & Sign In Process both generates the URL to the registration page for distribution, as well as imports registrant information into the respective event in Veeva CRM. To schedule the Event Registration & Sign In Process:
- Navigate to the Process Scheduler.
- Edit the Event Registration & Sign In Process job.
- Schedule the process or run the process immediately by selecting Run. It is recommended to schedule the job to run daily.
Creating Registration Forms
Registration forms are created by creating EM_Catalog_vod records that contain form details, for example, event fields, as well as approval information.
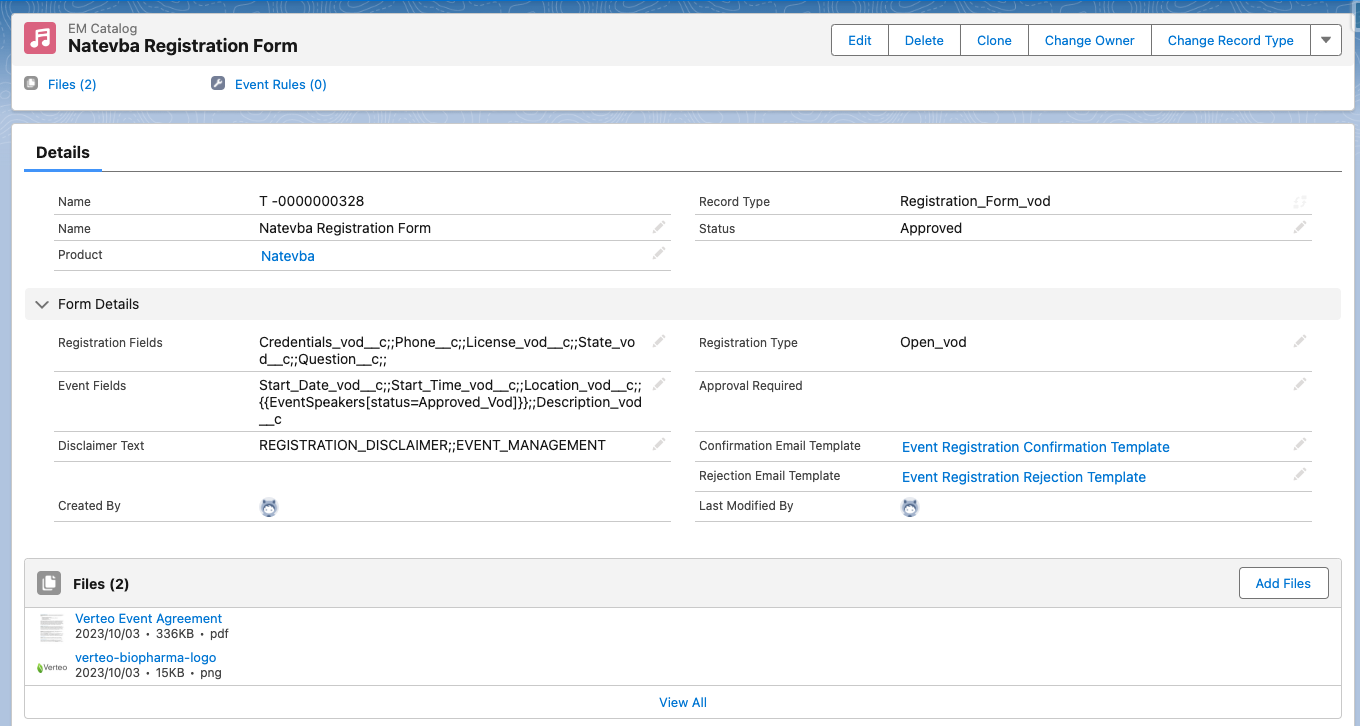
The following sections describe the various types of EM_Catalog_vod fields and sections that define the registration form’s details and fields, matching event attributes, banner images, and more:
- Basic Fields – Fields that are required for any created registration form
- The Approval_Required_vod Check Box – Defines if open registrants must be approved by the event organizer before approved for the event
- The Disclaimer_Text_vod Field – Defines text that displays as a disclaimer on the registration form that attendees must agree to before submitting the form
- Matching Event Attributes – Optional EM_Catalog_vod fields to assign the appropriate registration form template when creating or updating an event
- Confirmation and Rejection Email Templates – Fields that can be populated to specify Approved Email templates automatically sent to registrants when approved or rejected from the event
Basic Fields
The following EM_Catalog_vod fields are required for any created registration form:
- Record Type = Registration_Form_vod
- Name_vod
- Status_vod – Available values are:
- Approved_vod – The EM_Catalog_vod record is automatically assigned to events based on Creating Registration Form Assignment Rules
- Staged_vod – Does not assign the EM_Catalog_vod record to events
- Registration_Type_vod – Available values are:
- Open_vod – Anyone with the registration link can register to the event
- Closed_vod – Only targeted recipients who receive the link through an Approved Email can register. See Sending Targeted Registration Links via Approved Email for more information.
-
Event_Fields_vod – A double semicolon separated list of EM_Event_vod fields to display on the registration form. You can also add each event speaker’s Speaker_Formatted_Name_vod field to this list using the {{EventSpeaker}} token. The list of speakers can be further filtered based on their Status_vod field using the [status=STATUS] parameter on the token. For example:
Topic_vod__c;;Start_Time_vod__c;;{{EventSpeaker[status=Approved_vod]}}
The event’s Name or Event_Display_Name_vod field automatically displayed in each registration form and should not be added to the list of event fields. When the Topic_vod or Description_vod fields are added, the field displays as a single column on the registration form on larger devices.
-
Registration_Fields_vod – A double semicolon separated list of EM_Attendee_vod fields to display on the registration form for recipients to complete as part of form submission. The following types of fields are supported to add to this list:
- Text – Up to 255 characters are supported
- Phone
- Picklist – Only single-select picklists are supported
- Check box – Displays to registrants as a picklist with values for Yes and No
Add <R> to the end of a field name to mark the field as required. For example:
Credentials_vod__c<R>;;City_vod__c<R>;;State_vod__c<R>;;License_vod__c
First_Name_vod, Last_Name_vod, and Email_vod fields are always included and marked as required in each registration form and should not be added to the list of registration fields. If registration should be enabled for event speakers, add the fields configured in Registration_Fields_vod on the EM_Event_Speaker_vod. The fields are updated when an event speaker fills out the registration form.
Defining a Disclaimer
Populate the Disclaimer_Text_vod field to reference a Veeva Message whose text displays as a disclaimer on the registration form that attendees must agree to before submitting the form. This field is optional. If this field is left blank, no disclaimer displays.
Use the following format to reference the appropriate Veeva Message:
MESSAGE_NAME;;Category
The Category_vod of the Veeva Message must be EVENT_MANAGEMENT and the Type_vod must be Label_vod. The text of the Veeva Message can use the following HTML tags to create a rich-text format for the disclaimer:
- <p> – the dir attribute can be set to rtl to ensure right-to-left languages display correctly
- <br>
- <b>
- <i>
- <u>
- <ol> and <ul> – <li> tags within ordered and unordered lists are supported
- <a> – Hyperlinks must have the attribute target=“_blank”
Only one Veeva Message is supported per registration form. Configure multiple languages of the same Veeva Message to display disclaimers in different languages.
Enabling Requiring Registrant Approval
Select the Approval_Required_vod check box if approval is required for open registrants. When selected, registrants must be approved by the event organizer before they receive a confirmation email. See Reviewing Registrants for more information.
This check box only applies to open registrants. Targeted recipients invited via Approved Email are automatically approved.
Matching Event Attributes
The following fields are optional, but can be configured to assign forms based on the event attributes:
- Product_vod – When populated, the matching Product_vod on an event is used to determine the corresponding form to use
- Location_Type_vod – When populated, the matching Location_Type_vod on an event is used to determine the corresponding form to use
- Event_Format_vod – When populated, the matching Event_Format_vod on an event is used to determine the corresponding form to use
If these parameter fields are blank, the registration form matches to any value of the corresponding field on the event. When there are multiple forms, an exact match on these parameters is used to determine the appropriate form for an event.
Confirmation and Rejection Email Templates
The following fields on the EM_Catalog_vod record can be populated to specify Approved Email templates automatically sent to registrants when they are approved or rejected from the event:
- Confirmation_Email_Template_vod – Select the appropriate Approved Email template automatically sent to registrants when approved. When targeted registrants complete the registration form, they are automatically sent the selected Approved Email template.
- Rejection_Email_Template_vod – Select the appropriate Approved Email template automatically sent to registrants when rejected
Uploading a Banner Image and Agreement Policy
After creating the EM_Catalog_vod record, admin users can upload a company logo and event agreement document to display on the registration form by using the record’s Files related list:
- Agreement Policy – A required document that must be viewed by registrants in order to register. Populate the File’s CRM_Content_Type_vod field with Event_Registration_Agreement_vod. The attached document must be a PDF. Due to mobile devices potentially limiting the agreement to a single page, it is recommended the PDF be only one page.
-
Banner image – A banner image that displays in the top-left corner of the registration form. Populate the File’s CRM_Content_Type_vod field with Event_Registration_Banner_vod.
The banner image must have the following properties:
- Format – The following formats are supported:
- .PNG
- .JPG/.JPEG
-
.GIF
GIF files do not animate.
- Aspect ratio of 2:1
The combined file size of Agreement Policy document and Banner Image should not exceed 10 MB.
Creating Registration Form Assignment Rules
Business admin users can create EM_Event_Rule_vod records that automatically assign a registration form template to new and updated EM_Event_vod records:
- Navigate to the Event Rules related list of the appropriate EM_Event_Configuration_vod record.
- Select New.
-
Populate the following fields:
- Record Type = Registration_vod
- Country_Override_vod – Enter the appropriate country, if applicable
- Registration_Form_vod – Select the appropriate Registration_vod type EM_Catalog_vod record
- Select Save.
Multiple EM_Event_Rule_vod records can be created to assign multiple allowed registration forms for an event type.
Generating an Event Registration Link
When a registration-enabled event is created or updated, an EM_Catalog_vod record is automatically referenced in the event’s Registration_Form_vod field based on configured EM_Event_Rule_vod records and matching form attributes to Product_vod, Location_Type_vod, and Event_Format_vod.
If multiple matches are found, the first match is assigned to the event. If a match is not found, the Registration_Form_vod field does not populate.
If the event’s Product_vod, Location_Type_vod, or Event_Format_vod fields are updated, the Registration_Form_vod field may also update if the field updates result in a different registration form matching to the event.
To ignore any matching logic, populate the event’s Registration_Form_vod field when creating the event to manually assign the event’s registration form.
Once a registration form is associated to the event, a unique registration link for the event is automatically generated and stored in the following fields:
- Registration_URL_Long_vod – The full URL to the registration form
- Registration_URL_vod – A shortened, user-friendly URL to the registration form
The registration link is inactive until the event is synced through the Registration & Sign In job and the Publish_Event_vod check box is populated. The link then remains active until the event's End_Time_vod.
The Publish_Event_vod check box does not update automatically. Customers must define and configure this field to activate or inactivate an event’s registration link during the correct stage of the event’s lifecycle. For example, administrators can configure the Salesforce Approval Process to update Publish_Event_vod to true after an event is approved.
Sending Targeted Registration Links via Approved Email
Content administrators can include the registration link to the event in Approved Email templates using the following tokens:
- {{EM_Event_vod__c.Registration_URL_Long_vod__c}} – When sent, this token displays a targeted registration URL unique to each recipient. Targeted links are only supported for attendees and event speakers, all other recipient types will display the normal registration link.
- {{EM_Event_vod__c.Registration_URL_vod__c}} – Displays an open registration URL
It is recommended to use the {{EM_Event_vod__c.Registration_URL_Long_vod__c}} token, since targeted links can accessed as open links if they are forwarded from the original recipient to other recipients. See Targeted Registration for more information.
Adding a Registration QR Code® to Print Templates
Content creators can include a QR Code® that represents the event registration link within Print Templates, using the {{RegistrationQRCode}} to display the registration link as a QR Code® that attendees can scan.
By default, the QR Code® generates a 200x200 pixel square image. Content creators can customize the size of the square image by adding the <Size=SIZE> parameter. For example, {{RegistrationQRCode<Size=1000>}} generates a 1000x1000 pixel image for the QR Code®.
Add the <O> parameter to mark the token as optional.

Registering for an Event
Recipients accessing the registration form’s URL can view event details and complete the form to register for the event.
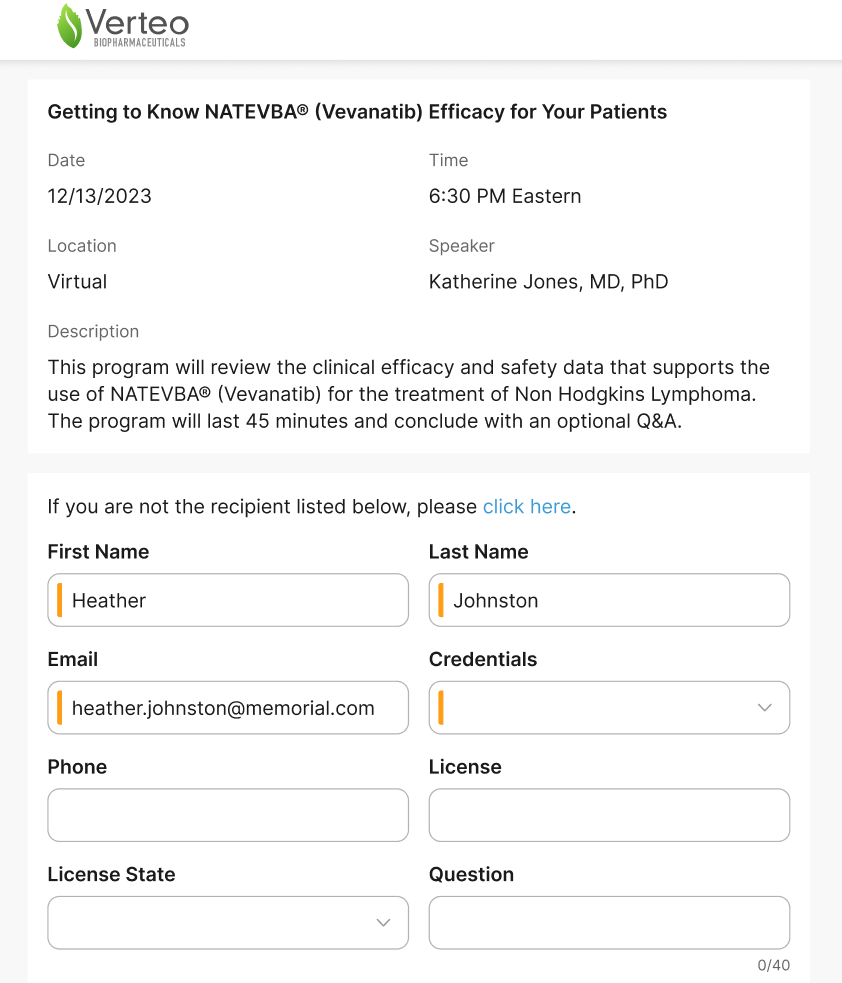
Depending on the registration form configuration and the link used, recipients will land on varying landing pages to register.
Open Registration
Open registration is available when the Registration_Type_vod field is Open_vod. Recipients can register by scanning the print QR Code® or directly via Registration_URL_vod link and completing the form.
If recipients access the link when Registration_Type_vod is Closed_vod, a message notifies the recipient that the event is invite only.
Targeted Registration
Targeted links sent via Approved Email are unique to the recipient. When targeted recipients access the link, their first name, last name, and email address automatically populate on the form.
If the Registration_Type_vod field is Open_vod, recipients of targeted link can forward the form to other potential registrants. To ensure forwarded recipients do not register on behalf of the original recipient, a message and link displays to the forwarded recipient that enables them to register as themselves.
Forwarded recipients cannot access the targeted link if the form's Registration_Type_vod is Closed_vod.
Submitting Registration
After populating all of the appropriate fields, attendees can complete their registration by selecting Register.
If the registration form has a configured disclaimer or Agreement Policy document, attendees must agree to the disclaimer and view the Agreement Policy document before they can select Register.
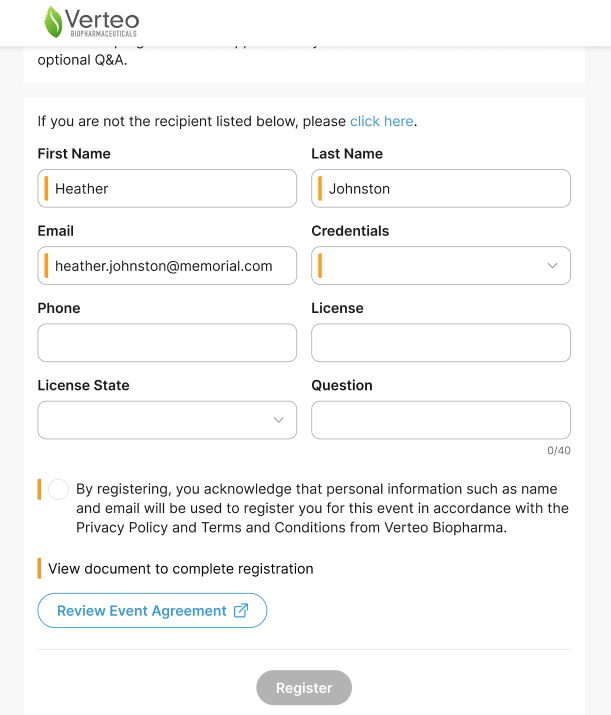
If the registration form has the Approval_Required_vod check box selected, registrants must be approved before they are confirmed for the event and receive a confirmation email. If Approved_Required_vod is not checked or recipients register via targeted links, registrants do not need to be reviewed and receive an automatic email confirmation upon registering.
Displaying Key Contact Information
To help registrants communicate with the event organizer, the Key_Contact_Name_vod or Key_Contact_Email_vod fields for the event display to the registrant upon completion of registration or registration errors. Administrators are responsible for defining the appropriate information in these key contact fields.
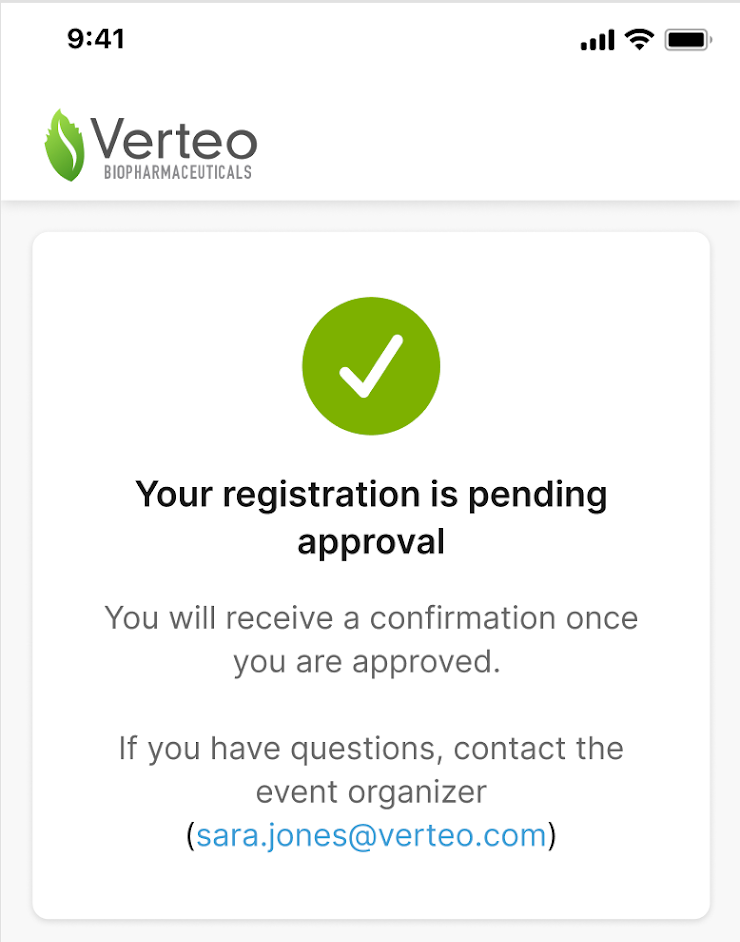
Syncing Registrants with Veeva CRM
Registrants are immediately synced to Veeva CRM upon registering. If the attendee registered via a targeted link, the associated EM_Attendee_vod or EM_Event_Speaker_vod record is updated as part of the sync:
- Status_vod – Updates to Registered_vod
- Registration_Timestamp_vod – Updates to the registration timestamp
- Registration_Status_vod – Updates to Registered_vod. Only applies to EM_Attendee_vod records.
- Registration_Method_vod – Updates to Targeted_vod. Only applies to EM_Attendee_vod records.
- All other fields defined on the registration form – If a field defined in the registration form’s Registration_Fields_vod field is populated by the registrant, the corresponding field in Veeva CRM also updates
If the attendee registered via an open link, an EM_Attendee_vod record is created as part of the sync with the following fields:
- First_Name_vod – Populates based on the value entered in the registration form
- Last_Name_vod – Populates based on the value entered in the registration form
- Email_vod – Populates based on the value entered in the registration form
- Registration_Timestamp_vod – Updates to the registration timestamp
- Walk_In_Status_vod – Updates to Needs_Reconciliation_vod
- Registration_Method_vod – Populates with one of the following values:
- Open_vod – The registrant used an open registration link to register
- Forwarded_vod – The registrant used a targeted link forwarded from the original recipient to register
- All other fields defined on the registration form – If a field defined in the registration form’s Registration_Fields_vod field is populated by the registrant, the corresponding field in Veeva CRM also updates
-
The Status_vod and Registration_Status_vod fields populate depending on if the registrant must be approved by the event organizer:
Approval Required?
Status_vod
Registration_Status_vod
Yes
Registration_Pending_vod
Pending_Approval_vod
No
Registered_vod
Registered_vod
If an error occurs when updating EM_Attendee_vod or EM_Event_Speaker_vod record as part of the Event Registration & Sign In process, the error is noted in the Sync Alert History section. Admins can review, address, then retry any errors that occur.
Reviewing Registrants
When completing the registration form, registered attendees are updated in the event and can be viewed by event organizers.
- Targeted Registrants – Recipients that registered through links sent via Approved Email are automatically approved. Confirmation emails are sent upon syncing registrant information to Veeva CRM.
- Open Registrants – If an event’s registration form has a selected Approval_Required_vod check box, open registrants are treated as walk-in attendees to the event that end users must review, reconcile, and approve or reject. When approval is not required, open registrants automatically receive confirmation emails upon syncing registrant information to CRM.
Reconciling Open Registrants
Open registrants must be reconciled to existing accounts in Veeva CRM before they can be approved to be added to the event:
-
Navigate to the Attendee Reconciliation page in the event.

-
Select the appropriate open registrant.
Attendees with a status of Rejected or Signed do not display.
- Search for the appropriate match.
- Select Confirm Match to reconcile the registrant to the appropriate account.
Event Attendance Rules with Reconciled Registrants
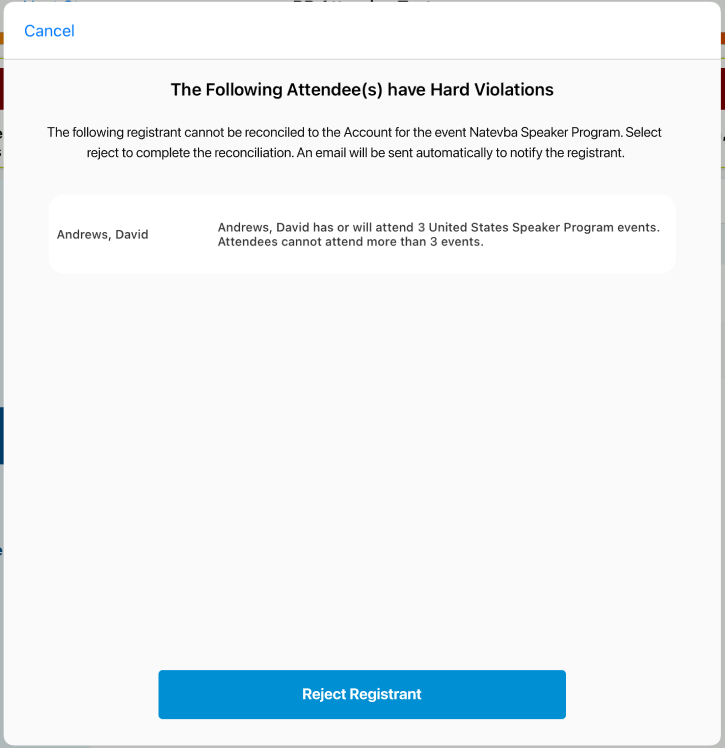
When matching a registrant with an account, any configured Event Attendance Rules are checked before the match is confirmed. If a rule is violated, the appropriate rule warning displays and event organizers can take one of the following actions:
-
If the rule is a Hard Warning-type rule, event organizers can select Reject Registrant to immediately reject the registrant and send them a rejection email via Approved Email
-
If the rule is a Soft Warning-type rule, event organizers can submit comments if they are available or required, then can select Confirm Match to proceed with matching the registrant
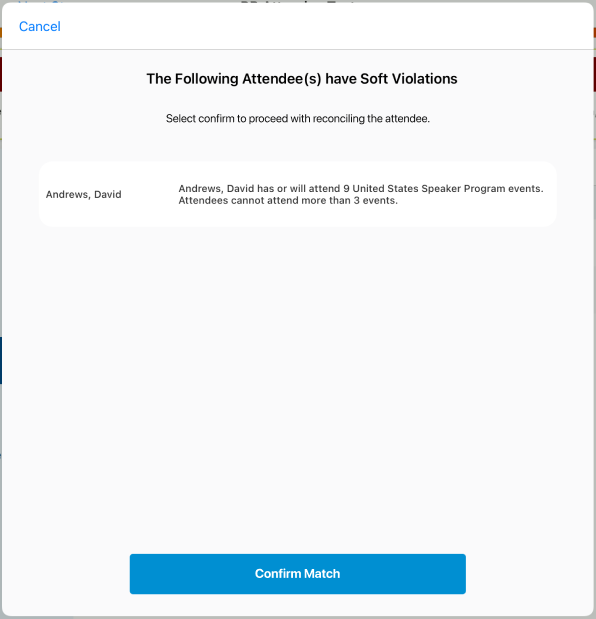
Configured Event Attendance Business Rules are checked when reconciling open registrants, but not when reconciling walk-in attendees captured from the traditional sign-in method.
Approving or Rejecting Open Registrants
To approve or reject open registrants:
- Navigate to the Attendee section in the event.
- Select the appropriate registrant.
- Select Edit.
-
Update the Status_vod field to the appropriate value:
- Registration_Approved_vod – Approves the registrant. Only open registrants that have been reconciled to an account can be approved.
- Registration_Rejected_vod – Rejects the registrant
- Select Save.
After saving, the appropriate confirmation or rejection Approved Email is sent to the registrant. The sent email address uses the Email_vod value entered from registration.
To bulk approve or reject, enable Mass Update for Attendees or Editing Related Lists Inline in Lightning for Events Management to update Status_vod field for multiple attendees.


